The Cost of Siding Installation

The cost of siding is based on the type and size of home, as well as your choice of material. Premium options like stucco, metal, and wood are often more expensive than vinyl or fiber cement.

Siding

The weather also plays a significant role in the length of time it takes to complete the project. Rain or snow slows outdoor construction, while extreme heat can lead to worker fatigue. Contact Siding Installation Murfreesboro TN for professional help.

When planning to replace your home’s siding, you need to consider several factors that can influence the total cost. These include the type of siding you choose, material costs, and installation fees. In addition, you should factor in any applicable taxes or fees. These can add up quickly, so it is important to understand the overall cost of your project before committing to any project.

Siding costs can vary significantly from one type to the next, so it’s essential to compare prices before choosing a product. The type of siding you choose can also affect the price, since some materials are more durable and require less maintenance than others. Additionally, some materials are better suited for different climates than others, so be sure to research the options available.

Regardless of the type of siding you choose, it’s essential to ensure proper installation. This will help ensure that your new siding will last for years to come and that it will provide the protection you need from the elements. If you’re considering a DIY installation, it’s important to consider your comfort level with handling tools and working on scaffolding or ladders. This type of project can be dangerous if done improperly.

If you are replacing siding on a two-story house, the first step is to calculate the square footage of each wall. This can be done by summing the length of each wall and multiplying it by the height of the house. For a more precise estimate, you should include the surface area of any architectural features like gables or dormers, as these can affect your sizing calculations.

Once you have a clear understanding of the square footage of your house, you can determine the number of panels and trim that will be needed to complete your project. If you’re replacing windows or doors, you should include them in your sizing estimates as well. This will help you avoid any surprises when it comes to ordering your materials. Lastly, be sure to include the cost of any additional insulation that may be required to achieve your desired results.

Material

When siding a home or commercial building, the material used to cover the structure is vitally important. The right material will provide protection from harsh weather conditions, lock in heat and cold, and enhance its aesthetics. Today’s siding materials are designed to withstand the extremes of temperature and climate without fading, cracking, or deteriorating. The right choice can also boost its resale value and increase energy savings.

Before you start the project, take into account the configuration of your house and the number of windows, doors, dormers, and other architectural features that will need to be sided. This will determine the amount of siding you will need to order and will have a significant impact on the cost. In addition, the type of siding you choose will play a role in its installation and maintenance costs.

Some of the most popular choices include vinyl, fiber cement, and natural wood. Each has its own advantages and disadvantages, but a professional siding contractor will be able to guide you in selecting the material that is best for your climate and home design.

For a vinyl project, you will need a utility knife or scoring tool for trimming and cutting the material. You can also use a power saw for larger pieces. If you are using a power saw, remember to wear safety glasses and work within your limits. Alternatively, you can use tin snips to cut and shape the siding. If you are using tin snips, avoid closing the blades completely at the end of each stroke for a neater, cleaner cut. For projects that require a lot of trimming, you can use a compound aviation-type snip. It’s also a good idea to have a nail hole slot punch on hand, which is used to elongate the hem slots in the siding panels for nailing.

When installing the siding, ensure that there is adequate clearance between it and other surfaces, such as roofing, roofing trim, and windows. This will prevent water damage, pest infestation, and other issues. In addition, you should make sure that the flashing and caulking are properly installed to keep moisture and air out of the walls.

Design

Homeowners should be aware of the design and installation aspects involved in a siding project. This will help them budget for the project and avoid any surprises down the line. It is also important to understand that siding installations should only be performed by a professional installer. Poorly-installed siding can lead to water infiltration and moisture problems that damage drywall, trim, and other structural components. In addition, ill-fitting siding can make a house look shabby and give off the impression that it is not well-maintained.

The cost of a new siding installation will depend on the size of the house and the type of material used. Generally, the larger the house, the more expensive it will be to install. The square footage of the house will determine the number of materials and labor hours required for a complete installation. It is also important to consider the weather conditions where you live, as these will dictate the types of materials that are available and the installation costs.

When choosing the type of siding to be installed, homeowners should select a style that fits with the architecture of the house. For example, board-and-batten siding complements farmhouses and clapboard suits old houses. Moreover, the color of the siding should be chosen carefully, as it will affect the overall appearance of the home. It is also a good idea to consult a professional for advice regarding the best type of siding for your home.

Siding is available in a variety of designs and colors, and some styles are designed to be energy-efficient. This can lower utility bills and reduce the load on the heating and cooling system. In addition to the financial benefits, new siding can improve a home’s appearance and make it more attractive to potential buyers.

In some areas, there are additional costs associated with installing siding, such as permit fees and disposal charges. It is also a good idea to keep all receipts and documentation from the project for tax purposes. Improvements to a primary residence are typically considered capital improvements, which may be deducted from your taxable income. However, it is advisable to discuss the cost of your siding project with your tax consultant before making any decisions.

Installation

Aside from adding beauty to a home, siding provides important protective layers against weather damage, pests, and energy loss. In order to ensure the quality of a siding installation, it is best to hire professionals rather than trying to do it yourself. While DIY installations may save money, shoddy work and low-quality materials can lead to expensive repair and replacement costs in the future. Professionals also have the knowledge and experience to complete the job quickly and efficiently.

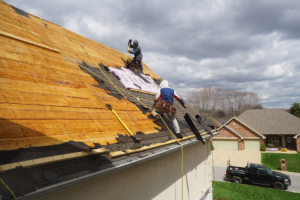
Siding installation is a complex process that involves numerous steps. First, the contractor will strip the existing siding and install a base layer of oriented-strand board, or OSB. This material is similar to plywood and helps protect the frame from water, wind, and insect penetration. It is important to use OSB that is pre-treated to resist moisture, as untreated wood can lead to mold and insect infestations. Next, the installer will apply a water-resistant barrier to help protect the wood from damage. This barrier can be applied to the entire house or specific areas, depending on your needs.

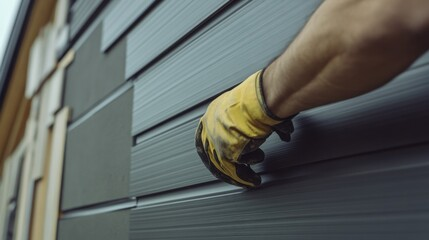
Once the waterproof barrier is in place, the installer will add a shingle over the top to protect the underlying OSB and shingles from sun and rain damage. The installer will then install a gutter and fascia if needed, as well as any corner posts or other trim pieces that are required. Once these are in place, the installer can begin installing the vinyl panels. It is important to leave a quarter inch gap between the bottom of each panel and the gable or window trim. When working on a corner, a special tool is used to punch out raised notches that snap into the trim. This eliminates the need for nails, which could damage the siding panel over time.

Before starting the installation process, it is important to have the necessary tools and prepare the work area. This includes removing any items that are in the way of the siding installation, such as downspouts and light fixtures. It is also a good idea to keep children and pets inside during the installation process, as it can be very noisy.

How Roofing Systems Are Installed

Roofing is one of the most important components of your home. When properly installed, it can boost your property value and keep you and your family comfortable for decades to come.

Before you hire a roofer, find out whether they have the right licensing and insurance. This includes a Certified Roofing Contractor license and workers’ compensation insurance. Contact Roofing Montana now!

The roof substrate provides a foundation for the installation of a weatherproofing roof layer. Depending on the roofing system, the substrate can be a solid material or a roof membrane. A roof substrate can also be used as a building component in addition to being a surface for the installation of a roof coating.

A solid substrate is a type of base or frame that supports other components of a roof system, such as insulation and the roof covering. It is generally made of wood, but may be made of other materials such as plywood or oriented strand board (OSB). The substrate must be strong enough to support the weight of all the other components and also provide sufficient thermal insulation.

Some types of substrate can be modified to improve their performance, such as by adding fire retardant chemicals. A substrate can also be treated to help with acoustics or moisture control.

MBCI metal standing seam roof and through-fastened roof panels can be installed on open framing or solid substrates. The type of substrate will impact the accessories that can be used with the panel and also impact engineering requirements for a project, such as uplift testing. For example, a through-fastened roof system requires a special type of fastener and clip that meets the manufacturer’s specifications for each panel.

A system of flashings used to seal the edges of a roof membrane, including walls, expansion joints, drains, gravel stops, and other penetrations. The flashings can be either base or cap flashing.

The substrate must be able to accommodate the thickness of the roof-covering material and allow for proper drainage. The substrate should be free of cracks, holes, or other defects that might affect the waterproofing ability of the roof-covering material.

Asphalt, a natural byproduct of petroleum, is the most commonly used material for the substrate of built-up roofs. It is often mixed with clay emulsifiers and water in order to form an emulsion that can be applied to the roof deck. There are a variety of other underlayments that can be used, including polyethylene and rubberized asphalt.

Shingles

Shingles are the part of a roof that most people see, but they’re just one component of a complex roofing system. Shingles are typically made from a durable, weather-resistant material such as wood, clay, slate or asphalt shingle, but can also be fabricated out of metal or concrete.

Asphalt shingles are the most common type of shingle used in American homes, and come in several different varieties to suit different home styles and preferences. Strip shingles, also known as three-tab shingles are the most basic and economical, while architectural or dimensional shingles have multiple layers to create a more refined look that replicates natural materials like shake, tile, and slate roofing. These shingles are thicker than strip shingles and often last up to 30 years.

Composite or synthetic shingles are relatively new roofing materials that blend together a variety of different materials. They are designed to mimic the appearance of natural roofing materials while providing increased durability, strength, and resistance to the elements. Some manufacturers of these shingles include DaVinci Roofscapes or Unified Steel.

Clay tiles are another time-honored roofing material, and they can add a touch of elegance to Spanish- or Mediterranean-style homes. They’re also resistant to fire, rot, and insects and help regulate interior temperatures. They’re very heavy, though, and must be supported by sturdy roof trusses.

The word “shingle” is derived from the German word Schindel, meaning a roofing slate. The shingles in your roof protect your house from the sun, wind, and rain. But if you have a weak immune system, your roof may not be able to keep you safe from the virus that causes shingles.

The symptoms of shingles are a red, blister-like rash that usually appears in a band around the torso or face. It starts with tingling and itching, and may cause pain as the blisters break open. If you develop shingles, your doctor will likely prescribe antiviral medications such as acyclovir or famciclovir to treat the infection. The shingles rash will usually disappear within 2 weeks once the blisters have scabbed over. But if the virus is left untreated, it can lead to long-term problems with your body’s immune system.

Underlayment

Roofing underlayment is an important part of a roof’s structure and water-resistant design. It’s a material that protects the roof deck from moisture and helps prevent tar from leaking into the house. Typically, it’s installed directly on the roof deck before other roofing materials are applied. Underlayment is a vital element in any roofing project, but it’s especially important for those who live in areas with extreme weather.

Underlayment is made from either felt or synthetic material and protects the roof deck before other roofing materials are installed. Felt underlayment is often used in low-sloped roofs, while synthetic underlayment is typically recommended for steeper slopes. Some manufacturers even specify that certain types of underlayment should only be used for specific roof types and slopes to ensure the best results.

Both types of underlayment are effective, but it’s important to choose the right type for your roof. Felt underlayment is usually cheaper but can be susceptible to damage and leaks, especially in high wind conditions or during installation. Synthetic underlayment is more expensive but is more durable and provides a better level of protection.

Compared to felt underlayment, synthetic underlayment is more resistant to fungal growth and does not wrinkle when exposed to moisture or sunlight. This means it requires less maintenance and repairs than felt underlayment. It’s also lightweight, which makes it easier for contractors to haul up onto the roof. It also retains less heat, which can help keep the roof cooler during installation and decrease the stress placed on the roof’s frame and structure.

Most synthetic underlayments have a sticky back that allows them to adhere to the roof deck and create a waterproof seal. They can be installed in areas that are prone to leaks, such as eaves, valleys, vents, chimneys, skylights, and vent pipes. Some types of self-adhered underlayment also have a non-skid surface that helps prevent falling debris and make it safer for roofers to work on.

If you choose to use a synthetic underlayment, be sure to follow the manufacturer’s instructions carefully to ensure the underlayment performs correctly. Often, they can only be used on roofs with a slope of 4:12 or lower. If you use them on a higher-slope roof, you must provide adequate overlap to avoid moisture problems. Using underlayment that isn’t recommended by the manufacturer can also void the warranty for your roofing system.

Flashing

Flashing is a strip of metal that lies in between different parts of the roofing system to prevent water from seeping through. It is critical in areas like roof valleys, where two sloping roof planes meet and around roof penetrations such as chimneys, vent pipes and skylights. Without flashing, these areas could leak and cause damage to the underlying materials and interior of a home. Flashing is installed to create a seal in these vulnerable spots, and can be made from copper, galvanized steel or aluminum.

Roofing is a complex system, and it’s important to leave any installation work to a professional roofing contractor. Installing flashing correctly is a complicated task that requires a great deal of skill, as the right type of material must be used to ensure the area is waterproofed.

Roof flashing is usually made of a sheet of metal that is rolled or bent over the joint to be protected. It’s a common part of any roofing job, and can be found in areas where the roof meets a wall or other structure like a chimney, dormer or skylight. Flashing can be made of several different materials, including copper, which offers the best protection from corrosion. It’s also possible to have flashing made of a plastic membrane such as ethylene or propylene for added moisture control.

There are three basic types of roof flashing: base flashing, counter flashing and step flashing. Each has its own purpose, but all are designed to provide a protective barrier against moisture leaks in critical roof areas like valleys or where different roof components intersect.

For example, valley flashing is often hidden under shingles and consists of one continuous piece of flashing that protects the gap at the bottom of a roof valley. It is often reinforced with a sheet of tarpaper for extra strength. Counter flashing is placed on top of a piece of base flashing, and guards against water leakage into the space between the roof and a wall or other structure.

Another kind of flashing is called pipe flashing, and is used around protrusions such as vent pipes that extend through a roof. It is usually designed to fit the diameter of a pipe’s opening and create a snug, watertight seal.